The Christensen Knot
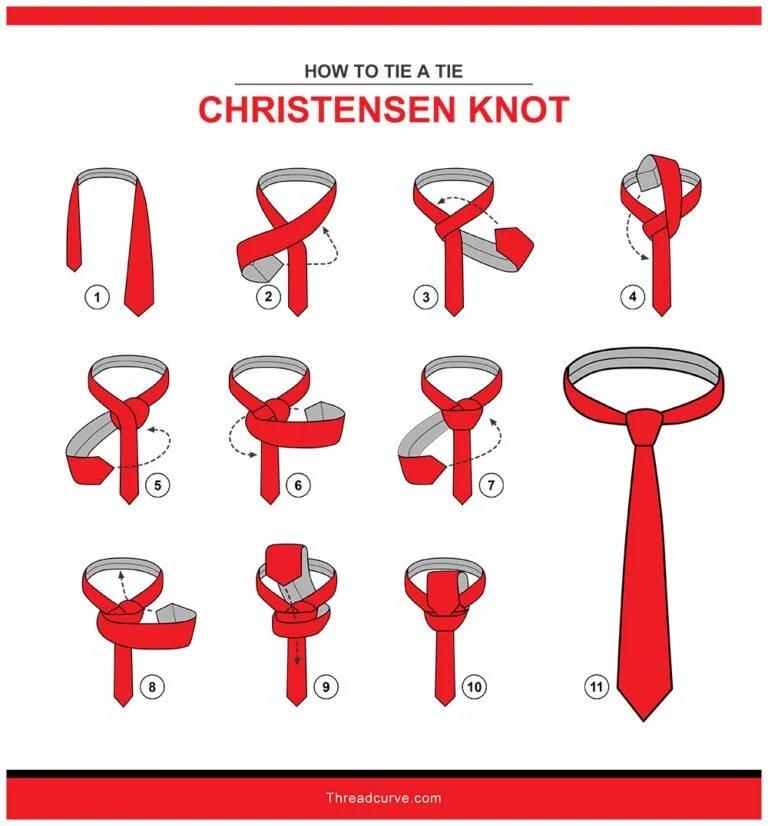
- Drape the necktie around your collar with the thick end on the left. This end should be hanging a good four to six inches lower than the finished length you desire.
- Cross the thick end horizontally in front of the thin end from left to right.
- Bring the thick end around behind the thin end horizontally from right to left.
- Flip the thick end up in front of the loop around your collar.
- Tuck the thick end down behind the loop around your collar, emerging on the right side of the thin end.
- Bring the thick end in front across the earlier horizontal band and the diagonal you created in Step 5. Slip a finger under this new horizontal crossing.
- Bring the thick end around behind the knot from left to right.
- Bring the thick end across the front, right on top of the horizontal fold you made in Step 6. (Your finger should still be holding the fold open.) Keep both horizontal bands held slightly off the collar with a finger.
- Bring the thick end up underneath the loop around your collar.
- Tuck the thick end down behind both of the horizontal crossings and pull through.
- Pull the knot into place by holding the knot with one hand. Now tug gently on the thin end with the other. Use your finger to tease out the diagonal folds until the X shape of the knot is very clear.
Done properly, there should be a distinct hourglass taper: narrowest in the middle of the knot, and wider at the top and bottom. You may need a wide collar spread to keep from hiding the top corners of the knot under your collar points.
Congratulations! You have completed the one & only Christensen Knot. This standout necktie style will spice up any casual or business-casual outfit you plan to wear. Don’t be surprised if people stop and do a double-take when they notice that your tie doesn’t look like other people’s ties!
Boutonniere Knot
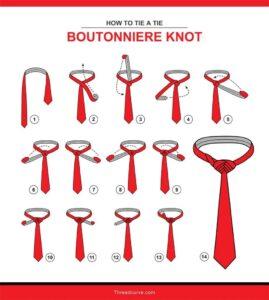
- Cross the thin end of the tie over the thick side.
- Bring the thin side of the tie up and under the tie collar, then back down across the knot of the tie to take the tail over to the other side.
- Take the tail of the tie under the knot, taking it horizontally to the other shoulder.
- Bring the tail back across the front of the tie now.
- Take the tail of the tie up under the collar, then back down and over the collar, staying on the same side of the knot.
- Bring the tail back to the other shoulder, going under the knot.
- Take the tie up and over the neck loop, then back down and under the collar, then through the back loop of the knot.
- Tighten and straighten your Atlantic knot.
Balthus Knot
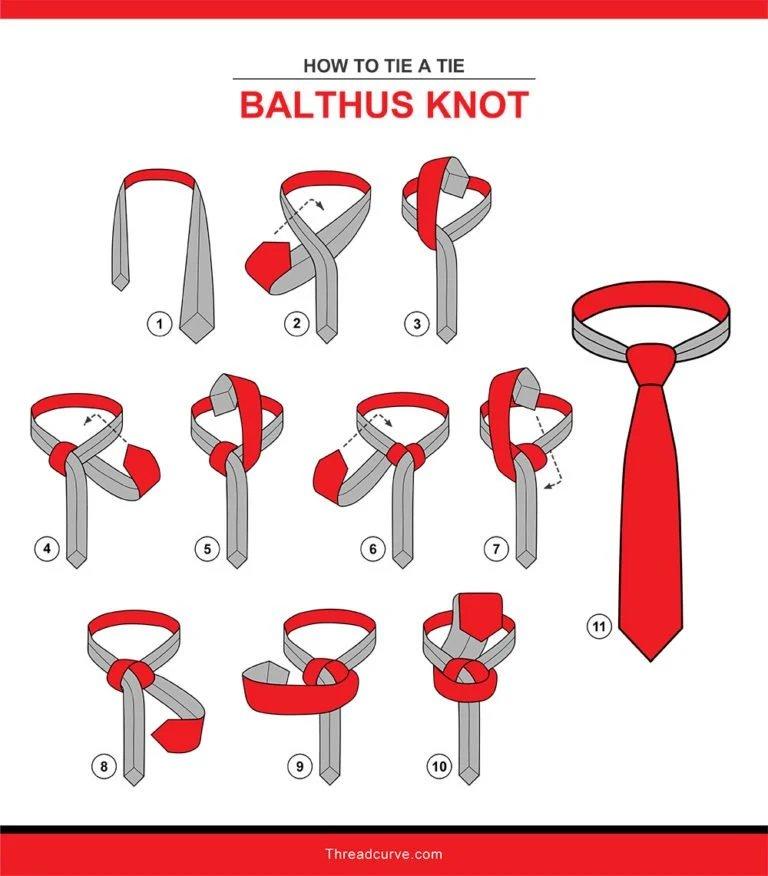
1.Place the tie around your neck with the back side of the tie facing outward.
- Criss-cross the two ends of the tie together, bringing the skinnier end over the top of the thicker part of the tie.
- Bring the thick side of the tie up over the neck loop and bring it back down again under the collar, or neck loop, pulling it through the collar and crossing under to the other side.
- Pull the tie over and through the collar again, bringing it across to the opposite side.
- Repeat, going through the collar and over to the other side again.
- Pull the tie across the front and then behind the knot, bringing the end of the tie up and over the back side of the knot.
- Place the end of the tie through the loop you created in the step above.
- Pull the tie down through the knot and tighten.
Cape Knot
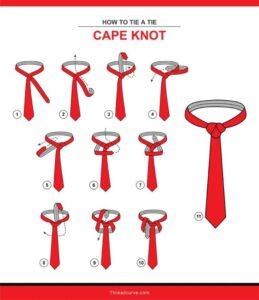
The cape knot is striking because it looks complicated. This knot works very well with patterned ties and paisley ties, as well as solid ties. You may get a little more “wow” factor with patterned ties because of the complexity of the knot.
Instructions
- Bring the skinnier end of the tie over the front of the tie and then pull it under and over the collar.
- Hold the tail of the tie out to the side, then wrap the end under the front of the tie.
- Pull the tail up and over the collar, then back down and over the front of the tie again.
- Pull the tail under and over the collar again.
- Bring the tail end of the tie back under the tie, then over and under the collar.
- Bring the tail through the last loop you just made at the back of the tie.
- Tighten and straighten your tie. You will have three distinct, mostly vertical, knot sections.
Capsule Knot
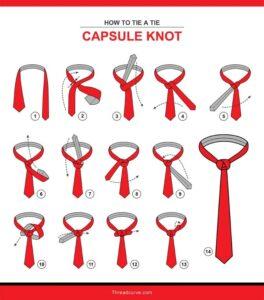
- Pinch the thicker side of the tie closed where you plan to make the knot. Pinching the fabric means you’ll bring the two edges together to create a little fold.
- Cross the active side of the tie over the top of the pinch.
- Bring the tie up under the collar and back down over the top of the collar on the other side.
- Bring the tie under the knot and over to the other side.
- Wrap the tie over the top of the knot, but not completely covering the knot. You want this flap of fabric to be slightly lower than the knot so the top still shows. Your tie knot should now look like an inverted V at the top with a band of fabric running horizontally across the bottom.
- Bring the tie up and under the collar, then back down over the collar on the same side.
- You want to bring the tie under the knot again and over to the other side, but don’t pull it too tight. You’ll be creating a new loop of fabric next to the knot. This loop should be somewhat loose.
- Bring the tie up and over the collar on the other side of the knot to create a second loop of fabric on this side. The tail will go back under the collar to cross over to the opposite side.
- Take the tail and feed it through both the last two loops you made on either side of the knot.
- Tighten and straighten your capsule knot so that the base knot has two horizontal layers, one on top of the other, with two wings meeting at the top on either side in an inverted V shape.
- Tuck the excess into your shirt or under your collar.
Cavendish Knot

- Cross the thicker side over the thinner side, placing the thicker side on top.
- Bring the thick end under the thinner side and across to the opposite side.
- Cross the thick side over the thinner side again, taking the thicker half of the tie to the opposite side.
- Now, bring the thicker side of the tie under the collar and up.
- Bring the thick side down and back to your starting side.
- Take the thicker half of the tie and bring it back under the knot and over to the opposite side.
- Take the thicker end back over the top of the knot and over to the opposite side.
- Bring the thick end up and under the collar.
- Take the tie back down, pull it through the top loop of fabric on the knot, pull through and tighten to create your knot.
Dapper Knot

The dapper knot is quite flamboyant, just the knot you want when you want to make a big impression. It’s probably far too showy for the office but it’s definitely perfect for weddings and other events where you want to really stand out, style-wise.
Instructions
- Cross the thick side of the tie over the thinner side, taking it to the opposite shoulder.
- Bring the thicker side of the tie up, under the collar, then back down and over, still staying on the opposite shoulder side of the cross-section.
- Straighten the tie so that it hangs straight down.
- Now, hold the two pieces of tie (the front and the tail) together with one hand, holding them about two inches below the collar.
- With your other hand, bring the tail of the tie up and wrap it around the thick half of the tie twice. The back side, the side with the seam, of the tail will be facing outward. The thick side of the tie will become slightly pinched.
- Insert one finger beneath the two loops you just made, creating a little space between the loops and the tie they are surrounding.
- Pull the tail out toward the shoulder opposite your starting shoulder and fold the fabric up so that now, the front side of the fabric is facing out.
- Bring the tail up under the knot at your neck, then over and down so that it covers the front of your tie.
- Feed the end of the tail through the loops you made in the tie. You have just made a top loop on the knot with the tail. Fluff this up slightly because this is a feature of the dapper knot.
- Straighten and adjust as needed
Double Cross Knot

The double cross knot, or double knot, doesn’t have a whole lot in common, looks-wise, with the cross knot (also known as the Christensen knot). This is a great everyday tie knot and a perfect knot for professional settings. It’s also very simple to tie. You can make a double cross knot in just a few steps.
- Cross the thick side of the tie over the skinny side.
- Bring the tie under the crossed section horizontally, then back across the top of the tie.
- Wrap the tie around the knot again twice, ending on the starting side of the knot.
- Bring the tie up and under the knot, then back down and through the top loop of the knot.
- Tighten and straighten.
Eldredge Knot

- Start by placing the tie around your neck in reverse, with the thicker side on the opposite side that you normally use. What’s interesting about the Eldredge knot is that the thinner end is the active end you’ll be using to make the knot, so your tie will be on the opposite side. You want your active end, the thinner end, to be very long. You’ll need it.
- Cross the active side over the top of the tie, moving it to the opposite shoulder.
- Bring the active side under the knot and pull it horizontally back to the starting shoulder.
- Bring it up and over the knot, crossing to the other side, then back down through the collar. This piece of the tie will now have the underside facing outward.
- Bring the tie horizontally across the knot, so that now the good side is facing outward.
- Bring the tie up under the collar, then back down again across the knot.
- Extend one finger across the top of the knot as you bring the tie under the knot and across to your starting shoulder, then pull it through the loop that is covering your finger.
- Gently pull so there is no bunching or excess in the knot but do not pull too tightly or you’ll destroy the design.
- The active end of the tie should be to the second shoulder side of the knot. Pull it up over the collar, then back down under the collar.
- Bring the tie up over the collar and across, pulling it down through the collar on the other side of the knot. The tie end will now be toward the starting shoulder side of the knot.
- Bring the tie up through the last loop you just made, moving across the knot to the opposite side. It helps if you place two fingers through the loop first, then feed the end of the tie into your fingers and pull it through this way.
- Tighten the tie, but not too much, and tuck the end of the tie into your collar.
Ellie Knot

The ellie knot is a slightly simpler version of the Eldredge knot, which is a notoriously hard tie knot to make. The ellie looks fancy and works well with patterned and solid ties. This is a good knot for formal wear and important professional occasions.
Instructions
- Pinch the thick side of the tie just below your neck to put a fold in the fabric.
- Bring the skinny side of the tie over and across the top of this folded section to make an X.
- Pull the skinny side of the tie up and under the collar, then back down over the collar.
- Pull the tie to the opposite side of the knot.
- Bring the tie under the knot, then back over the top of the knot. This is a layered look, so do not go directly across the knot and cover up all your work so far. Maintain your layers while you work.
- Pull the tie up under the collar, then back down over the top, bring the tie down to the opposite side of the knot.
- Wrap the tie under the knot, going back across.
- Staying on the same side of the knot, bring the tie up over the collar, then back down under the collar.
- Pull the tie to the opposite side of the knot and bring it up and over and collar and back down under the collar again, staying on the same side of the knot.
- Pull the tail over to the opposite side and go up over the collar, then back down under the collar again.
- Tuck the excess into the bottom loop of the tie at the back of the knot
- Tighten and straighten.
Fishbone Knot

The fishbone, or fish bone, is a complicated tie knot that is very similar to the Eldredge. This knot does have a complicated look but many of the steps for creating it are repetitive, so it isn’t as difficult as it appears. This is a wonderful formal tie knot. This knot looks great with solid ties. Patterned and striped ties may look a little sloppy and strange with this knot.
- The thinner end of the tie is the active end for creating this tie knot.
- Cross the active end of the tie over the top of the tie, going across to the opposite side.
- Bring the tie straight up, staying to the second side of the tie knot, taking it under the collar and then bringing it back and over the collar, still staying on the second side.
- Bring the tie under the knot to move it horizontally across to the starting shoulder side.
- Take the tie up over the collar, then bring it back down under the collar, taking it across to the opposite side.
- Do it again, bring the tie up over the collar, then back down under the collar, moving over to the other side.
- Repeat, going to the second side.
- Repeat, moving the tie to the starting shoulder.
- Pull the tail of the tie down, aligning it with the front of the tie. Tighten the knot and tuck the tail into your shirt to hide it.
Four In Hand Knot
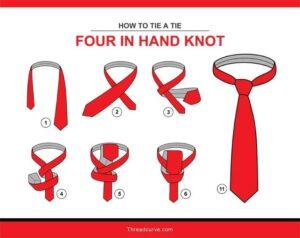
- Take the thicker side of the tie across the top of the thinner side, moving it to your opposite shoulder.
- Take the tie under this crossed area, holding it horizontally toward your starting shoulder.
- Move the tie horizontally across the knot, moving it horizontally to the opposite shoulder.
- Take the tie under the collar, then back over and through the loop on top of the knot.
- Tighten, adjust and you’re done!
Four Rings Knot

- Pinch the edges of the thick side of the tie to create a fold
- Bring the skinny side of the tie crossways across the fold.
- Take the tie under the collar and across, going back down over the collar on the other side.
- Form a loop in the tie as you bring it under the knot and over to the other side. The loop should be very loose and open.
- Bring the tie up and across to the other side again, going through the loop you just made. Keep the knot very loose.
- Hold the tail of the tie horizontally going toward your shoulder. The underside of the tie should be facing outward.
- Bring the tie back across and under the knot, going up through the loop on the opposite side. You are still keeping the knot very loose.
- Tuck the tail of the tie behind the knot and into a flap on the underside of the knot.
- Tighten as needed and fluff up and spread the four rings that create this knot design.
Grantchester Knot
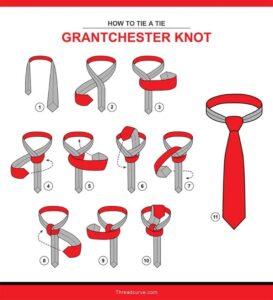
- Begin with the tie around your neck facing inward, so that the underside is facing out.
- Bring the thick side of the tie under and across to the opposite shoulder.
- Take the tie over the crossed section horizontally, moving back to the starting shoulder.
- Wrap the tie back under the knot, taking it to the opposite side.
- Take the tie horizontally across the knot again, going back to the starting shoulder.
- Bring the tie up under the collar, then bring it back down, crossing over the top of the knot. Now you’ll be on the second shoulder side of the knot.
- Bring the tie under the knot across to the starting shoulder again, then back over the top of the knot to go back to the second shoulder.
- Bring the tie up under the collar, then back down and through the top loop of the knot.
- Tighten and adjust.
Hanover Knot

The Hanover tie knot is named for the Hanover royal dynasty, the house that is the direct ancestor of the current British monarchy, the House of Windsor. You’ll get to that tie knot a little later. This is a simple, elegant, symmetrical knot in a perfect triangle shape. This is a somewhat larger knot, so you want to use a tie that isn’t very thick or the knot could end up looking bulky and sloppy.
Instructions
- Start with this tie around your neck so that the underside (the backside) is facing outward.
- Cross the thicker side under the thinner one, taking it to the opposite shoulder.
- Bring it back over the top of the cross-section, holding it horizontally to the starting shoulder.
- Bring the tie up and under the collar, then back down over the top of the knot, taking the tie across to the second shoulder.
- Wrap the tie under the knot, taking it horizontally back to the starting shoulder.
- Take the tie up and under the collar again, then back down under the knot, moving to the opposite side.
- Take the tie horizontally across the top of the knot again.
Bring the tie up and under the collar, then back down and through the top loop of the knot.
Tighten and adjust.
Kelvin Knot
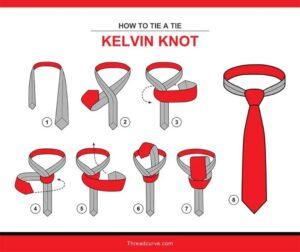
- Start with a reverse necktie, meaning that the underside is facing outward.
- Cross the thicker side of the tie under the thinner side, taking it across to your other shoulder.
- Bring the tie back across this crossed section, taking it back to your starting shoulder.
- Take the tie back to the other side, going under the knot.
- Bring the tie over to the starting shoulder again, going over the top of the knot.
- Take the tie up and under the collar, then back down through the top loop of fabric on the knot.
- Tighten and adjust.
Krasny Hourglass Knot
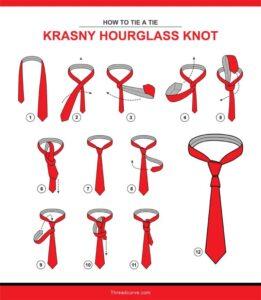
- Start by making a standard four-in-hand knot. To do this, you will cross the thicker side of the tie on top of the skinnier side, then bring it back under the skinnier side of the tie to take it back to your starting shoulder. Take the tie back across, going on top of the other side of the tie, then back under and over the collar at the knot. Loop the thick end of the tie through the top loop of fabric you created. Tighten and adjust to complete the four-in-hand knot. Now, the real work begins.
- Now you will switch, as the tail of the tie becomes the active end of the tie. Take it and hold it out horizontally to your starting shoulder.
- Place your finger next to the four-in-hand tie knot you just made, going to the opposite shoulder.
- Bring the tail of the tie over to the opposite shoulder. The underside, or backside, of the fabric should be facing out. Take that finger and place it on top of the tie.
- With your other hand, bring the tail back to the starting shoulder, leaving your finger in place. Go under the tie, not over.
- Leaving your finger in place, bring the tail of the tie back over to the opposite shoulder.
- Take the tail of the tie and tuck it under the tie, feeding it through the loop you just made.
- Tighten and fluff as necessary so that both knots are roughly the same size. The Krasny hourglass shape should now be complete.
Linwood Taurus Knot

- Give yourself plenty of fabric to work with on the active end, the thicker end, of the tie.
- Cross the thick end of the tie over the thinner end.
- Pull the tie up under the collar, then back down over the collar and back to the other side (your starting shoulder).
- Hold the cross-section of the tie you just created with your thumb on the bottom and your fingers on the lop. Extend two fingers forward and lay them beneath the active end of the tie.
- With your other hand, cross the active end of the tie under the stationary end, moving it to the opposite shoulder.
- Grasp the tie knot now with your other hand, thumb on the bottom of the knot, holding the loop you just made next to the knot in place.
- Extend two fingers of that hand alongside the collar of the tie. Take the active end of the tie up over your fingers and the collar of the tie, then back down under the collar.
- Leave your fingers in place inside the loop as you bring the tail through that loop, then remove your fingers so you can thread the tail through the loop on the other side of the knot.
- Tighten, but not too much. These two loops will be somewhat loose in this fun type of tie knot.
- The tail of the tie is at your starting shoulder now. You will bring it up under the collar on that side next to the knot, then bring it back down and through the central loop of the knot. This is the loop that is between the two loose side loops you created.
- Tighten and straighten your tie and fluff up the two side loops as needed to create this fun tie knot.
Manhattan Knot
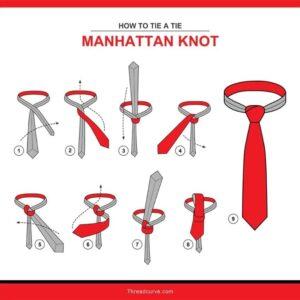
- Start with the underside of the tie facing outward.
- Cross the thick end of the tie under the thinner end, moving it to the opposite shoulder.
- Cross the thinner side of the tie over the top of the thicker side, taking it to the opposite shoulder.
- Place the thick end of the tie over the top of this cross-section, going back to your starting shoulder.
- Bring the thick end of the tie up under the collar, then back down and over the collar, taking it to the other side of the knot.
- Bring the tie up under the collar and then tuck it down through the top loop of fabric on the knot.
- Tighten and straighten the knot.
Merovingian Knot
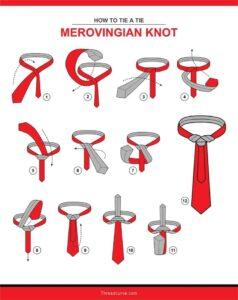
- Start by crossing the thick side of the side under the thinner side, moving it to the opposite shoulder.
- Take the active end (thick end) of the tie up over the collar, then back down and under the collar. Pull it through, staying on the same side of the knot (the second shoulder side, opposite your starting shoulder).
- Take the active end back over the top of the knot to move it to the opposite shoulder.
- Bring the tie up and under the collar, then back down and over the collar, staying now toward the starting shoulder side.
- Take the tie under the knot, up and over the collar, then back down and under the collar on the other side.
- With one hand, bring the tail of the tie straight up. You’ll probably need to hold it up with your mouth or chin, because you’ll likely need both hands for the next step.
- Take the tail of the thicker end of the tie and flip it upward so that the backside of it is facing outward, away from you and facing toward whatever you are facing.
- Loop the tail of the thick side of the tie through the underside of the knot, which is fully exposed because you have the tail lifted. Pull it through this loop that’s under the knot.
- Straighten and adjust. Yes, you have created the chosen tie knot.
Murrell Knot

- Cross the \thinner side of the tie over the thicker side, taking it to the opposite shoulder. For this tie knot, you’ll be primarily moving the thinner side of the tie as the active end of the tie.
- Bring the tail side up and under the collar, then back down and over the collar. Stay on the same side of the cross-section in the middle, the second shoulder side that is opposite your starting shoulder.
- Bring the active end of the tie back over to your starting shoulder, crossing under the knot.
- Take the tie up over the collar, then down and under the collar. Stay on the starting shoulder side of the knot.
- Bring the active end of the tie over to the opposite shoulder again, crossing in front of the knot.
- Take the tie under the collar and back down over the knot, pulling it through the top loop on the knot.
- Tighten and straighten your Murrell knot.
Nicky Knot
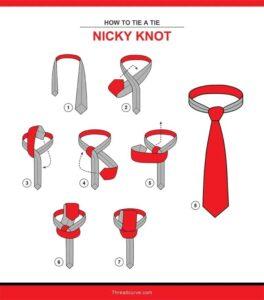
- Start with the underside of the tie facing outward, so the seam is showing and not the “pretty side” of the tie.
- Cross the thinner side of the tie over the thicker side to form an X, bringing the thicker side of the tie to the opposite shoulder.
- Take the thicker side of the tie up and over the collar, then back down and under the collar, crossing to the other side of the knot.
- Take the thick side of the tie horizontally back over the front of the knot, taking it to the opposite shoulder.
- Bring the thick side of the tie up and under the collar, then back down and through the top loop of the knot.
- Tighten and straighten your Nicky knot.
Onassis Knot
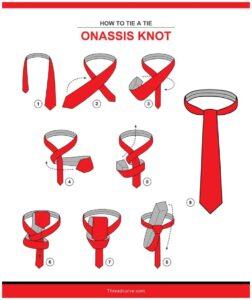
- Cross the thicker side of the tie over the skinnier side, bringing it to the opposite shoulder.
- Take the thicker side of the tie back under the thinner side.
- Bring the tie back over the top of the cross-section, taking it back to the opposite shoulder again.
- Pull the thicker side of the tie up under the collar, then back down through the top loop of the knot.
- Tighten the knot. Now, take the front flap of the tie, take it around and under the knot and pull the end of the tie up under the collar and then back down and over. The knot will now be covered and the tie will have a bit of a cravat-like look. You can add a decorative tie pin or simply let the tie speak for itself.
Plattsburgh Knot

- Start with an inverted tie, meaning that the underside will be facing out.
- Cross the thick side of the tie under the thinner side, bringing it toward the opposite shoulder.
- Take the tie up over the collar, then under the knot to bring the tie down and back to the starting shoulder.
- Take the tie back up over the collar, then down and under the collar to bring the tie back to the opposite side again.
- Return the tie back to your starting shoulder, going horizontally across the front of the knot.
- Bring the tie back up and under the collar, then back down again through the top loop of the knot.
- Tighten and straighten your Plattsburgh knot.
Pratt Knot
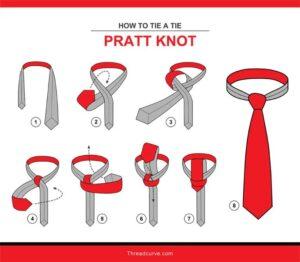
- Start with an inverted tie, where the underside of the tie is facing outward.
- Cross the thinner side of the tie over the thicker side, taking the thicker side of the to the opposite shoulder.
- Bring the thick side of the tie up and over the collar, then back down and under the collar. Stay on the side next to the cross-section you just created, rather than crossing back over to your starting shoulder (as you would in many other types of tie knots).
- Take the tie back to the opposite shoulder, going horizontally across the top of the knot.
- Bring the tie up under the collar, then back down and through the top loop of the tie knot.
- Tighten and straighten the pratt knot to complete your look.
Prince Albert Knot
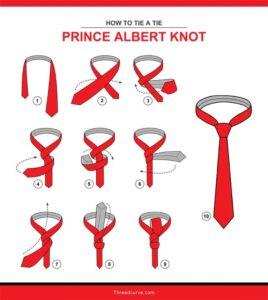
- Cross the thick side of the tie over the thinner side, taking it to the opposite shoulder.
- Take the tie back over to the starting shoulder, going under the cross section you just created.
- Bring the tie back across the knot and over to the opposite shoulder again, going horizontally across the top of the knot.
- Go back under the knot again, moving the tie over to the starting shoulder once more.
- Now, go back over the top of the knot once more, again taking the tie over to the opposite shoulder.
- Take the tie up and under the collar. When you bring it back down over the knot, you want to thread it through not one but two of the top layers of the knot. This creates the unique layered look of the double four-in-hand, or Prince Albert, knot.
- Tighten and straighten.
Rose Knot
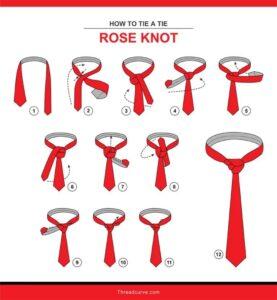
- Give yourself plenty of tie to work with. For this knot, you’ll be using the thinner end as the active end of the tie.
- Cross the thinner side of the tie over the thicker side, moving it to the opposite shoulder.
- Bring the active end of the tie up, under the collar and back down over the collar, crossing to the other side of the knot.
- Take the tie back over to the opposite side, going under the tie.
- Bring the tie back over the front of the knot, taking it back toward your starting shoulder, and take it up under the collar on that side.
- Bring the tie back down over the collar, moving it to your second shoulder.
- Take the tie back to the starting shoulder again, going under the knot.
- Loop the end of the tie through the bottommost loop of the knot, then over toward the opposite shoulder. Before bringing the tie down, take it under the collar.
- Bring the end of the tie up and loop it through the last loop you just made, then pull to tighten and tuck the excess into your collar.
- Fluff and adjust as needed to make your rose look pretty…and let your style bloom.
Saturn Knot
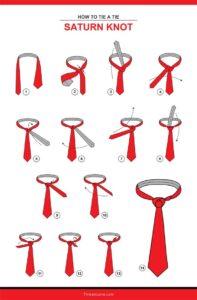
- Pinch the thick side of the tie to put a little fold in it just under your neck.
- With your other hand, cross the thinner side of the tie over this fold.
- Bring the tie up and under the collar, then back down again, moving the tie over to the opposite side.
- Take the tie back over to the starting shoulder, going horizontally under the knot.
- Bring the tie up, over the knot, then down again under the collar and over to the other side.
- Take the tie back across the front of the knot to go to the starting shoulder again, completely covering the knot with the tie fabric.
- Bring the tie up, under the collar and back down over the knot, taking it to the opposite shoulder.
- Fold the remainder of the tail of the tie to give it a little bit of poof, then wrap the tail around and under the knot, then back up on the other side of the knot. You’re wrapping the tail around the knot now so the center still shows.
- Tuck the tail of the tie into the back of the knot, looping it down through the bottom loop of the knot.
- Tighten and straighten the knot.
Simple Knot
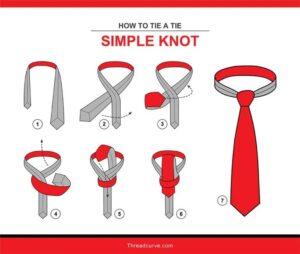
- Start with the tie inverted. This means it will face outward so that the underside is showing.
- Cross the thicker end of the tie over to the opposite shoulder, going under the thinner side of the tie.
- Bring the tie back over to your starting shoulder, going horizontally across this cross-section.
- Take the tie up under the knot, then back down through the loop of the knot.
- Tighten and straighten. That’s all there is to the simple knot!
Saint Andrew Knot
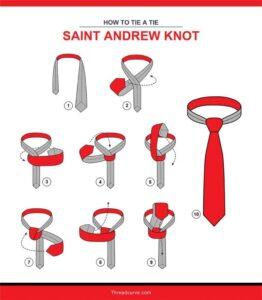
- Start with the tie inverted so that the underside (the “bad side”) is facing outward.
- Cross the thinner side over the thicker side, taking the ticker side to your opposite shoulder.
- Bring the thick side of the tie back to the starting shoulder, going horizontally across the cross section you just made.
- Take the tie back to the opposite shoulder, going horizontally under the knot to get across.
- Take the tie up and over the collar, then down and through, moving across the knot to take the tie back to the starting shoulder side.
- Go across the front of the knot again, taking the tie to the opposite shoulder.
- Take the tie up and under the collar again, then back down and through the knot, threading the tie through the top loop of the knot.
- Tighten and straighten to perfect your look and finish the St. Andrew knot.
Victoria Knot
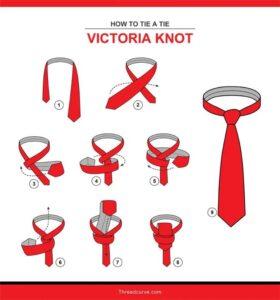
- Cross the thick side of the tie over the thinner side, moving it to the opposite shoulder from your starting shoulder.
- Take the tie back across, this time going under the cross-section.
- Go back across again, moving the tie once more to the opposite shoulder.
- Take the tie under the knot again to return to your starting shoulder.
- Go back over the top of the knot yet again, moving the tie to your opposite shoulder.
- Now pull the tie up and under the collar, then back down and through the top loop of the knot. If you pull the tie through the top two loops, you’ll make the Prince Albert knot.
- Tighten and straighten the knot.
Full Windsor Knot

- Cross the thicker side of the tie over the skinnier side.
- Bring the thick side of the tie up and under the collar, then back down over the collar, without moving to the other shoulder. You’ll still be on the side of the shoulder opposite your starting shoulder.
- Move the tie behind the knot, going back across toward your starting shoulder.
- Go up and over the collar on this side of the knot now, going back down the under the collar while still staying on the starting shoulder side.
- Bring the tie horizontally across the front of the knot, moving to your opposite shoulder again.
- Take the tie up under the knot and then back down the front of the knot through the loop of fabric you just made in the front of the knot.
- Tighten and straighten your elegant Windsor knot. This is what is known as the full Windsor, though it may also simply be called a Windsor knot.
Half Windsor Knot
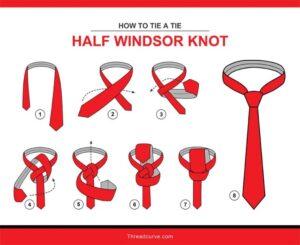
- Take the thicker side of the tie over the thinner side, moving to the opposite shoulder.
- Bring the tie under the cross section you just made, moving back to the starting shoulder.
- Take the tie up over the collar, then under the knot and back down, taking the tie across to the opposite shoulder again.
- Move the tie horizontally across the front of the knot to return to the starting shoulder.
- Take the tie up under the collar, then back down and through the loop you just made across the knot.
- Tighten and straighten your half Windsor knot.